How to Pan for Gold in a Creek
To pan for gold in a creek, classify gravel, work a controlled sample in water, and wash lighter sediment away while keeping the heavy material. Start where moving water naturally slows and test several spots before processing more material.
On this page (10 sections)
- What should you do before panning in a creek?
- Where should you look for gold in a creek?
- How do you classify creek gravel?
- How do you pan for gold in a creek?
- How do you avoid losing fine gold?
- Can a hand pump help with creek panning?
- How do you clean up a creek sample?
- Creek panning compared with river panning
- What other tools and methods should you understand?
- What is the best way to pan for gold in a creek?
To pan for gold in a creek, classify gravel, work a controlled sample in water, and wash lighter sediment away while keeping the heavy material. Start where moving water naturally slows and test several spots before processing more material.
Creek panning works because gold is heavier than common sand and gravel. Your job is to collect likely sediment, break it apart, and reduce it slowly enough that heavy material stays in the pan.
That basic idea sounds simple, but the way you handle each step changes what stays behind. A rushed pan can wash away the very flakes you came to find, while a careful one gives heavy grains time to settle.
Think of the process in three stages. First you choose where to sample, then you prepare the material, and finally you wash it down to a small concentrate.
Each stage needs a different kind of attention. Choosing a spot is about reading the creek and testing more than one place.
Preparation is about breaking up clay and removing stones that would crowd the pan.
Washing is about control. You use water and gentle movement to carry light sediment over the edge, but you pause often to let the pan settle.
It helps to work with small amounts at the start. A smaller sample is easier to keep level, easier to inspect, and less likely to lose fine material in a single careless motion.
As you learn how your creek material behaves, you can adjust the sample size and the speed of each movement. The method stays the same, but your control improves with practice.
Patience matters throughout. Gold does not separate itself just because you tilted the pan, and black sand left at the end is a sign to slow down rather than finish quickly.
If you keep those ideas in mind, the rest of the work becomes easier to follow. You will know why screening, washing, and final inspection each have a place in a creek outing.
What should you do before panning in a creek?
Check access rules and prepare a small set of hand tools before collecting sediment. Bring a pan, classifier, shovel or digging tool, snuffer bottle if allowed, gloves, and a container for samples.
Review local rules for public land, private property, stream access, and collection limits. Avoid digging into unstable banks or removing material from protected areas.
A pan and classifier are the core tools. Our guide to gold panning equipment explains what each tool does and what to bring for a short creek outing.
Where should you look for gold in a creek?
Sample places where fast water loses energy and heavy material can settle. Good starting points include inside bends, the downstream side of large rocks, the bottom of small drops, exposed bedrock, and cracks that collect black sand.
Check areas just below turbulent water, but work safely from stable ground. Gold can settle behind obstructions and in low pockets where lighter gravel continues downstream.
Look for dark, dense sand mixed with gravel. Black sand does not prove gold is present, but it can show that heavy minerals are collecting in the same area.
How do you choose a creek sample?
Take small samples from several nearby locations instead of assuming one spot represents the whole creek. Record where each sample came from and compare the amount of heavy material left after panning.
Start with natural traps such as bedrock cracks or compacted gravel. If the creek has a visible gravel bar, sample different parts of it, including the upstream edge and lower layers.
Use the same rough sample size for each test. That makes your results easier to compare and helps you decide where to spend more time.
How do you classify creek gravel?
Screen the gravel before panning so large rocks and debris do not crowd the pan. Break apart clay and compacted soil by hand or in water, then pass the material through a classifier.
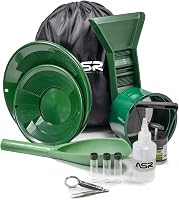
The SE Gold Prospecting-Sifting-Panning is a 13.25 in stackable classifier with a 1/12 in stainless steel mesh. Its mesh opening is 0.08 in, so it suits prospectors who want to remove larger gravel before washing finer material.
Place the classifier over your pan or bucket and add a manageable amount of material. Shake gently, use water to help break up clumps, and inspect oversized rocks for visible gold before discarding them.
The classifier is useful when creek gravel contains many stones or roots. Skip classification only for a clean, fine sample that already fits comfortably in the pan.
How do you pan for gold in a creek?
Fill the pan with classified material, cover it with water, and break apart every clump before washing. Keep the pan level while mixing so clay and trapped sediment do not hide heavier material.
Hold the pan under the water and use a gentle side-to-side motion. Let the lighter gravel rise and leave the pan gradually, while heavier sand settles toward the bottom.
Tilt the far edge slightly and use short movements to wash off the top layer. Add water as needed, but keep the motion controlled rather than sweeping the whole load out at once.
The SE 14 Inch Gold Panning Pan has dual riffles, including deep 1/4 in riffles and micro riffles, in a lightweight green plastic pan. Those riffles give heavy material places to settle as you reduce the sample.
Use the deeper riffles while removing larger sediment, then work more gently as the sample becomes mostly sand and heavy minerals. The green color can make small yellow flakes easier to see against the pan.
Keep the pan partly submerged when possible. Water supports the washing motion and helps carry light sediment away without requiring a sharp tilt.
How do you avoid losing fine gold?
Slow down when only black sand and fine sediment remain. Fine gold can move with the lighter material if you shake too hard, tilt too far, or pour water too quickly.
Use small rotations and short rinses. Watch the bottom of the pan after each movement, especially around riffles and the low side where heavy material gathers.
Keep the pan level between movements so the sample can settle again. Add only a little water at a time and let it clear before you decide on the next rinse.
Do not rush the final cleanup. A sample that looks nearly empty may still contain fine gold mixed with black sand.
Can a hand pump help with creek panning?
A hand pump can move collected water from a small working area, but it does not replace a pan or classifier. It may help when water collects in a shallow excavation or when you need to clear a small pocket before sampling.
The SeaSense Hand Bilge Pump is a self-priming manual pump with a removable 24 in x 36 in hose. It is designed for water removal from small boats, kayaks, canoes, bilges, and other places where water collects.
Its use is most practical where moving water by hand is difficult and local rules allow that type of work. It is not a gold recovery tool, and it should not be used to disturb a stream bank or bypass restrictions on water removal.
How do you clean up a creek sample?
Reduce the sample to heavy sand, then inspect it in a shallow layer of water under steady light. Keep the remaining material separate from other samples so you know which location produced it.
If you see color, work more slowly and remove light sediment in small amounts. Gold can be flat, bright, and difficult to distinguish from mica or yellow gravel, so do not assume every glittering flake is gold.
Save promising concentrates in a labeled container if local rules allow it. For a controlled indoor practice session, see how to pan for gold at home.
Creek panning compared with river panning
Creek panning uses the same gravity-based method as river panning, but smaller channels can make sampling pockets and bedrock traps easier to inspect. Rivers may offer larger gravel bars and more water, while creeks often have tighter access and shallower working areas.
The best choice depends on legal access, safe footing, water flow, and the type of sediment available. This guide to how to gold pan in a river covers the same process in a larger channel.
A creek can be a good place to learn because you can compare nearby traps without moving large amounts of material. Still, never treat a single visible flake as proof that a larger area is productive.
What other tools and methods should you understand?
A classifier removes oversized material before the pan. A pan concentrates the heavy fraction, while a hand pump only helps move collected water in suitable situations.
A dredge uses a different setup and may be restricted by local rules. Read how a gold dredge works before considering powered or suction-based equipment.
If you later use a sluice, learn what miners moss is and how it catches heavy material. Do not add equipment until your sampling shows that the location justifies more processing.
What is the best way to pan for gold in a creek?
Pick a legal, safe sampling area, classify the gravel, and wash small amounts slowly while comparing several creek locations. A 14 in riffled pan suits the main recovery work, the 13.25 in classifier helps prepare rough gravel, and the manual pump is only useful for clearing collected water where permitted.
The key rule is simple: sample first, process more only when the heavy concentrate supports that choice. If you want to know whether this hobby remains active today, read do people still pan for gold.
Frequently asked questions
Where should you pan for gold in a creek?
Look for places where the current slows, such as inside bends, behind large rocks, below drops, and along exposed bedrock. Sample cracks, gravel bars, and low pockets where heavy material can settle.
Test several locations because one productive spot does not prove the whole creek carries gold.
Do you need a classifier to pan for gold?
A classifier is not required, but it removes large rocks, roots, and debris before panning. Screening makes each pan easier to control and helps you process similarly sized material.
Choose the mesh size based on the gold size you expect and the material you are sampling.
How much creek material should you put in a gold pan?
Start with a manageable amount that leaves room for water and movement. An overloaded pan is harder to wash without losing fine gold.
Process smaller samples carefully, then repeat the test at the same location if the first pan shows promising heavy material.
Can you pan for gold in any creek?
No. Check land access, local prospecting rules, water restrictions, and permission before collecting sediment.
Some waterways are protected or privately controlled.
Use hand tools only where allowed, avoid damaging banks, and leave the creek close to its original condition.