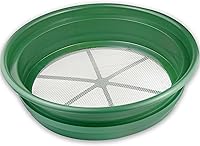
How to Make DIY Gold Prospecting Equipment
You can make basic DIY gold prospecting equipment from a plastic pan, a bucket, and a mesh screen for classifying material. Buy the riffled pans, sieves, and magnet tools ready made if you want them to work well from the first trip.
On this page (15 sections)
- What DIY gold prospecting equipment do you really need?
- Which parts can you build yourself?
- Which parts should you buy ready made?
- How does a classifier help you find more gold?
- How do you size a pan for the material you pan?
- How do you make a classifier frame at home?
- How do you pan classified material without losing fine gold?
- What tools help you save fine gold and black sand?
- How do you care for homemade and ready made gear?
- When should you move up from DIY gear to a full kit?
- Which kit suits beginners building their first setup?
- What should you avoid when you build your own gear?
- How do you plan a first trip with DIY gold prospecting equipment?
- How do you use books and maps with your DIY setup?
- What is the smartest way to build DIY gold prospecting equipment?
You can make basic DIY gold prospecting equipment from a plastic pan, a bucket, and a mesh screen for classifying material. Buy the riffled pans, sieves, and magnet tools ready made if you want them to work well from the first trip.
This post covers what to build, what to buy, and how the parts work together. We compared specs for pans, classifiers, and kits by mesh size, pan size, and included tools.
What DIY gold prospecting equipment do you really need?
You need a pan, a classifier, a scoop, and a way to store fine gold. Those four items cover digging through to saving what you find.
A pan separates gold from sand by weight, and a classifier removes large rock first. A scoop moves material, while a bottle or vial holds fine flakes.
You do not need a dredge, sluice box, or metal detector to start. Learn with a pan and classifier first.
Our guide to gold panning equipment lists each part and what it does. Read it before you build.
Which parts can you build yourself?
You can build the scoop, the bucket stand, and the classifier frame from common shop items. Those parts do not need exact tolerances.
A plastic scoop or sturdy cup digs well. Rest the classifier on a bucket rim, or cut a bucket top to make a stand.
Use a wooden frame or plastic hoop to hold mesh flat. The mesh must stay flat under load, or large rock bounces back into the fine material.
Test at home with dry sand and pebbles. If coarse pebbles pass, the mesh is too open or the frame is loose.
Which parts should you buy ready made?
Buy riffled pans, sieves, a magnet separator, and storage vials ready made. Those parts depend on exact riffle depth, mesh size, and magnet strength.
Riffles trap heavy particles while lighter sand washes over the edge. A smooth homemade pan has no trap, so fine gold washes out.
Dual riffles help more than one deep groove, since each ridge catches material on a different stroke. A sieve with stated mesh sizes lets you repeat a method.
If you do not know the opening size, you cannot tell whether fine gold passed through.
The Minelab PRO-Gold Panning Kit has a 15 in dual riffle pan with 3 zones and a 10 in single riffle pan. Minelab says the pans float in water.
The classifier fits a 5 gal bucket and has 2 handles.
How does a classifier help you find more gold?
A classifier removes large rock so you can pan more fine material in less time. Large rock fills your pan and slows each wash.
Pans work best with mostly sand and small gravel. Fist-sized rock fills the pan fast, so you wash less material per stroke.
Sorting first keeps the load in the range where riffles can trap gold. Stackable classifiers let you sort in steps, starting coarse, then finer.
Each step keeps only the size you want for panning.
SE says the classifier nests into a 5 gal bucket and stacks with other screens. The mesh opening is 0.08 in.
SE says the wire is 304 stainless steel for rust resistance.
How do you size a pan for the material you pan?
Pick pan size by the load you carry. A 14 in to 15 in pan holds more material but is harder to control in fast current.
An 8 in to 10 in pan suits small loads, crevices, and beginners. You can see the bottom and make short, steady strokes.
The SE 11-Piece Gold Panning Kit has 8 in, 10 in, and 14 in pans with dual riffles, including 3 in by 1/4 in deep riffles and micro riffles. That gives you a backup when material changes.
How do you make a classifier frame at home?
Make a flat frame that holds mesh tight and fits your bucket. A loose mesh or warped frame ruins the sort.
Cut a wooden hoop or use a plastic frame with a flat edge. Stretch mesh across it and fix edges with screws, staples, or wire.
The mesh should not ripple under one hand. Fit the frame across a bucket and test with a small load, shaking gently.
Coarse rock stays on top and fine material falls through. If the frame rocks, add a lip that rests inside the bucket rim.
How do you pan classified material without losing fine gold?
Pan with short, level strokes and keep the riffles under water. Fast or steep strokes wash fine gold over the lip with the sand.
Fill the pan about one third full with classified material. Submerge it and shake side to side to settle heavy particles to the bottom.
Tilt forward slowly and let light sand spill over the front edge. Stop before the riffles are clear and check them after each wash.
Keep your concentrate in a bottle with water, so flakes do not dry and blow away.
What tools help you save fine gold and black sand?
You need a magnet, a suction bottle, a magnifier, and vials to save what the pan finds. Each tool handles a different stage after panning.
A magnet pulls iron-based black sand from concentrate, while a suction bottle lifts flakes without dumping the load. A loupe helps you check riffles and vials for fine flakes.
The SE 11-Piece Gold Panning Kit has a 5 lb magnetic separator pen, magnified tweezers, a plastic bottle, glass vials, a 12 in scoop, and a loupe. Compare pan and mesh sizes first, as with best asr outdoor gold panning gear.
How do you care for homemade and ready made gear?
Rinse mesh, pans, and magnets with clean water after each trip. Dry mesh and metal parts fully before storage.
Sand and grit wear riffles and mesh over time. Rinse pans during work if grit builds up, since clear riffles trap gold better.
Check mesh for bent wires and frames for loose fasteners. A small bend lets coarse rock pass and wastes a bucket of work.
Tighten screws, replace mesh that no longer sits flat, and store vials upright. Carry the magnet in a pouch, since it pulls iron filings to its surface.
When should you move up from DIY gear to a full kit?
Move up when your homemade pan washes fine gold out or your screen lets coarse rock through. Those faults cost more gold than a kit.
A full kit gives matched pan sizes, stackable sieves, and storage tools. You can repeat the same method each trip and compare results.
The Minelab kit has a convertible carry bag that turns into a backpack. The SE 11-Piece kit has pans, sieves, tweezers, bottles, a magnet, a scoop, and vials.
Read our Minelab Pro-Gold Panning Kit review for the full breakdown.
Which kit suits beginners building their first setup?
Pick a kit with 3 pan sizes and 2 sieve sizes if you want range. Pick a kit with a large dual riffle pan and a small training pan if you want guidance.
Pick a single classifier if you already own pans.
The SE 11-Piece Gold Panning Kit suits beginners who want range. It has 8 in, 10 in, and 14 in pans, plus sieves with 1/2 in and 1/8 in mesh.
SE says the sieves stack and fit over a 5 gal bucket.
The Minelab PRO-Gold Panning Kit suits beginners who want a guided set. It has a 15 in dual riffle pan, a 10 in pan, a classifier, a magnet, a loupe, a suction bottle, a pipette, and vials.
What should you avoid when you build your own gear?
Avoid smooth pans, loose mesh, and oversized loads. Each lets gold escape or slows work.
A smooth pan has no trap for fine particles. Loose mesh sorts unevenly and can dump coarse rock into your pan load.
An oversized load fills the pan before riffles can work. Keep a bucket at knee height close to water to scoop, shake, and rinse mesh with less strain.
For kids, start with a small pan and coarse screen. Our guide to the best gold panning for kids covers pan size and safety.
How do you plan a first trip with DIY gold prospecting equipment?
Plan one short trip with a small load and a simple goal. Learn the pan motion before chasing a full bucket of paydirt.
Bring your pan, classifier, bucket, scoop, bottle, and towel. Set the classifier across the bucket, scoop a small amount, and pan the fine material that falls through.
Keep the first trip to one hour of panning. For flour gold, read about the best flour gold recovery equipment.
For larger material, a best portable gold dredge equipment guide covers setup and permits.
How do you use books and maps with your DIY setup?
Use books for method and maps for place. Neither replaces a working pan, but both help you choose where to dig.
A prospecting book can explain classification, riffle use, and black sand separation in order. Keep one book in your pack for the first season.
Maps help you find old workings, creeks, and access points. A map keeps you off land you cannot enter.
See our picks for the best buying gold prospecting books and the best buying gold prospecting maps.
What is the smartest way to build DIY gold prospecting equipment?
Build the scoop, stand, and frame. Buy the riffled pans, sieves, magnet, and vials.
That split gives you a working setup at low cost.
Start with one classifier and one pan. Learn to classify, pan, and save fine gold with that pair.
Add a second sieve size or a larger pan when your material calls for it.
For a ready made start, pick the SE 11-Piece kit for range or the Minelab PRO-Gold kit for a guided set. Add the SE 13.25 in classifier if you want a finer 1/12 in screen for classified material.
Frequently asked questions
Can you make gold panning equipment at home?
Yes, you can make a basic pan, classifier, and scoop from plastic, wood, and mesh. A ready made riffled pan and sieves work better for fine gold, since riffle depth and mesh size control what stays in the pan.
What is the cheapest way to start gold prospecting?
Start with one pan, one classifier that fits a bucket, a scoop, and a small bottle for gold. Add a magnet and magnifier later.
Keep the first load small so you can learn the motion before you buy more gear.
Should I build or buy a classifier?
Build one only if you can tension the mesh flat and fix it firmly. Buy one if you need stackable mesh sizes or a screen that fits a standard bucket.
A loose screen lets coarse rock mix back into fine material.
What parts are worth buying ready made?
Buy riffled pans, sieves with stated mesh sizes, a black sand magnet, and vials for storage. Those parts rely on exact sizes.
You can build the scoop, bucket stand, and carry bag from common household items.